Artificial grass is a great way to enjoy a green lawn without mowing or watering. It saves time and looks neat all year. However, just like any outdoor surface, it can still get damaged. Over time, you might notice gaps where pieces meet, burned spots from heat, or areas that feel uneven under your feet. These problems may look serious, but most of them can be fixed without replacing the whole lawn.
This guide explains everything you need to know about artificial grass repair in a simple and clear way. You will learn what causes problems, how repairs are done, what tools are used, and how to prevent future damage. Whether you plan to fix it yourself or hire a professional, this article will help you understand the process from start to finish.
Common Problems Found in Artificial Grass
Knowing what type of problem you are dealing with is the first step toward fixing it the right way. Artificial grass is designed to last many years, but certain issues can still appear over time. Most problems usually fall into three main categories: visible seams, heat damage, and uneven surfaces.
Open or Visible Seams
Seams are the lines where two pieces of artificial turf are joined together. When turf is installed properly, these seams blend in and are hard to notice. Over time, however, seams can open or become more visible. This often happens when the glue used to bond the seam breaks down, when sand or debris gets into the adhesive, or when the ground underneath shifts.
Temperature changes, heavy foot traffic, and poor original installation can also cause seam problems. When seams open, the lawn can look patchy and uneven. Exposed seam edges can curl up, which increases the chance of someone tripping. In most cases, seam issues start small but get worse if they are ignored, which is why early repair is important.
Burned or Melted Areas
Artificial turf can melt when exposed to high heat. Common causes include cigarette ashes, fireworks, hot charcoal from grills, fire pits, patio heaters, and even metal furniture left in direct sun. Another major cause is reflected sunlight. Certain windows or shiny surfaces can focus sunlight onto one spot on the turf and create intense heat.
Once turf fibers melt, they cannot be fixed with cleaning or brushing. The damaged section must be cut out and replaced with new turf to restore the lawn’s appearance.
Low Spots and Uneven Areas
Low spots are areas that feel soft, sunken, or uneven when walked on. You may also notice water pooling in these areas after rain. This usually happens when the base underneath the turf settles, washes out, or was not compacted properly. In some cases, infill sand has shifted, leaving the turf unsupported.

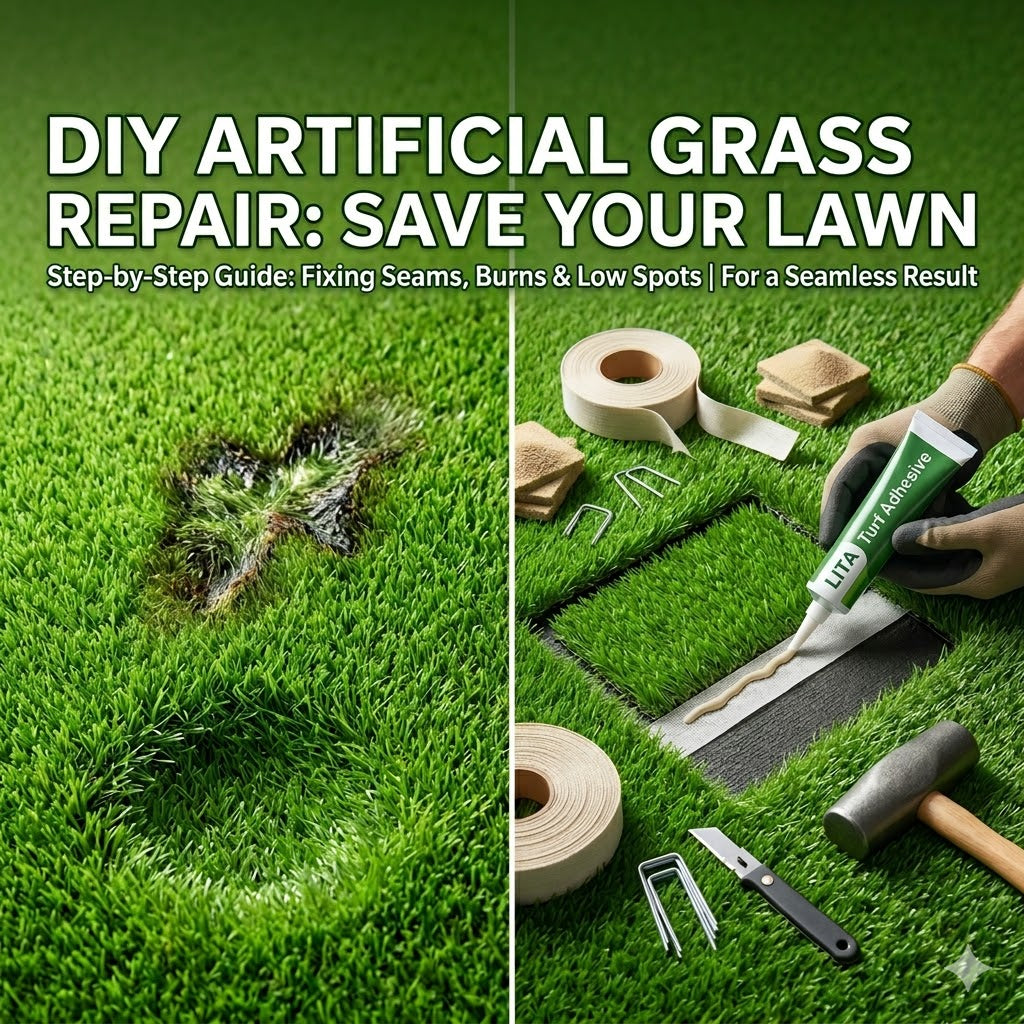
Tools and Materials Needed for Turf Repairs
| Tool/Material | Why You Need It | LITA Pro Tip |
| Artificial Grass Adhesive | Specifically formulated for turf backing. | Use waterproof, non-toxic glue for long-lasting results. |
| Seam Tape | The "bridge" that holds two pieces together. | Non-adhesive cloth tape works best when combined with glue. |
| U-Shaped Staples | Secures the turf and prevents shifting. | Galvanized staples prevent rust from showing on your lawn. |
| Utility Knife | For precision cutting from the backing side. | Always cut from the back to avoid slicing off the grass fibers. |
| Hand Tamper | To compact the base material for low spots. | Essential for preventing the dip from returning later. |
| Stiff Broom/Power Brush | To fluff up fibers and blend the repair. | Avoid wire brushes, as they can tear the synthetic grass. |
How to Repair Seams in Artificial Grass
Seam issues are one of the most common turf problems, and they are often repairable.
Fixing Small Seam Gaps
Small gaps usually happen when the glue under the seam fails. To repair this, start by brushing and removing all infill sand from both sides of the seam. Sand must be kept away from glue or the seam will not hold.
Fold the turf back gently and place seam tape centered beneath the opening. Spread turf adhesive evenly across the tape. Carefully bring the turf edges together, making sure they line up properly. Press along the seam and pull the grass fibers up so they do not stick to the glue. Place weight along the seam and allow it to cure fully before walking on it.
Repairing Major Seam Failures
If a long seam has fully pulled apart, more work is needed. Old seam tape and leftover glue should be removed. Before installing new tape, check the base underneath. If the ground is uneven or soft, it should be leveled and compacted first.
Lay the seam tape centered between the two grass edges. Apply a consistent layer of turf adhesive onto the tape. Important: Before sealing, double-check the grain direction of both turf pieces. The fibers on both sides must lean in the same direction. If they are mismatched, the seam will be visible as a dark or light line due to light reflection. Spread the glue using a notched trowel to ensure 100% coverage without it oozing onto the grass blades.
How to Fix Burned or Melted Artificial Grass
Burn damage cannot be reversed, but it can be replaced cleanly with the right method.
Cutting Out the Damaged Area
Start by clearing away infill from the burned area. Use a utility knife to cut a neat square or rectangle around the damage. Always cut from the backing side and follow the stitch rows to keep edges straight.
The shape should be simple, as clean lines make it easier to fit a patch.
Step-by-Step: Replacing a Damaged Patch
-
Cut Out the Damage: Use a sharp utility knife to cut out the damaged or burned section. Pro Tip: Try to cut a square or circular shape, as this makes it much easier to measure and fit the replacement piece.
-
Source a Matching Patch: Use a remnant from your original installation. If you don't have any left, "borrow" a small patch from a hidden area of your yard—such as a corner under a large planter or behind a shed—to ensure an exact color match.
-
Align the Grain Direction: This is the most critical step for an invisible repair. Check the direction the grass blades lean on your lawn and ensure the patch is oriented the exact same way. If the grains are mismatched, the patch will stand out like a sore thumb.
-
Dry-Fit: Place the patch into the hole to ensure it fits snugly without gaps. Trim the edges slightly if needed for a "seamless" fit.
-
Secure with Tape and Glue: Slide a piece of seam tape underneath the hole, centering it so it supports the edges of both the lawn and the patch. Apply a specialized turf adhesive evenly across the tape.
-
Set and Weight: Press the patch firmly into place. Use a comb or your fingers to pull any trapped grass fibers out from the glue line. Place a heavy object (like bricks or sandbags) on the patch and let it cure for at least 24 hours.
-
Finish and Blend: Once dry, add a small amount of infill and brush the area vigorously with a stiff broom to blend the fibers.
Installing the Patch
Slide seam tape underneath the hole so it supports the patch. Apply adhesive evenly across the tape. Place the patch into position and press firmly along the edges. Pull grass fibers up to prevent them from sticking.
Add weight and allow the glue to dry fully. Once dry, add infill and brush the area so the fibers stand upright. When done correctly, the repair blends in well and is hard to spot.
This method is a common and reliable form of artificial grass repair for heat damage.

Fixing Low Spots and Uneven Turf Areas
Low spots should be handled quickly before they grow larger or cause drainage problems.
When Infill Is the Only Problem
Sometimes turf looks uneven simply because the infill has shifted. This is common in high-traffic areas. To fix it, brush the turf against the grain to lift the fibers. Add infill slowly and brush it down into the turf. Repeat until the area feels firm and level.
This simple fix solves many small uneven spots.
Step-by-Step: Rebuilding a Settled Base
-
Expose the Base: Remove the infill from the sunken area using a vacuum or brush. Carefully cut the turf along the stitch lines (this makes the cut nearly invisible when closed) and fold it back to reveal the sub-base.
-
Clear Debris: Remove any organic matter, soft soil, or loose rocks that may have caused the settling.
-
Add Base Material: Fill the depression with crushed stone, decomposed granite, or "class 2 road base." Do not use topsoil, as it will compress and sink again.
-
Compact in Layers: Add the material in 1-inch increments. Crucial Step: Use a hand tamper or a heavy mallet to pack each layer until it is rock-solid. The final level should be about 1/2 inch below the surrounding base to account for the turf's backing thickness.
-
Reset the Turf: Fold the turf back over the leveled area. Ensure the edges line up perfectly with the original cut.
-
Secure and Groom: Use U-shaped turf staples or galvanized nails every 6 inches along the cut to secure the flap. Re-apply infill and brush the fibers upright against the grain to hide the seam and restore the lawn's cushion.
Repair or Replace: Which Option Is Better?
Not all turf damage should be repaired. In some cases, replacing part or all of the lawn makes more sense.
Repair is usually the right choice when damage is small, the turf is still in good shape, and matching material is available. Seams, small burns, and isolated dips can often be fixed at a lower cost.
Replacement may be better if the turf is very old, badly faded, or has many damaged areas close together. If the base was installed poorly across the entire area, repeated repairs may not last.
A professional can help inspect the site and recommend the best option based on long-term value, not just short-term cost.
How to Prevent Future Artificial Grass Damage
Preventing damage is easier and cheaper than fixing it.
Avoid placing grills, fire pits, or heaters directly on turf. Use mats or place them on concrete or pavers. Watch for windows or shiny surfaces that reflect sunlight onto the lawn. Window film or shading can help reduce heat buildup.
Brush high-traffic areas several times a year to keep fibers standing upright. Check infill levels and add more when needed. Keep water drainage paths clear and look for early signs of seam movement.
Regular care reduces the need for frequent artificial grass repair and helps the lawn last longer.
Final Thoughts
Artificial grass is designed to be durable, but it still needs care and attention. Seams can open, heat can cause burns, and the ground underneath can settle. The key is to fix problems early before they spread or become worse.
With the right tools, materials, and method, many turf issues can be fixed successfully. Whether it is a small patch or a base repair, proper artificial grass repair improves safety, appearance, and lifespan.
If the damage feels too large or complex, hiring a professional can save time and ensure quality results. With good repairs and regular maintenance, your artificial lawn can stay smooth, green, and beautiful for many years.
FAQ:
-
Q: Can I use regular super glue for turf repair?
- A: No. Regular glue is too brittle. You need a specialized, flexible turf adhesive that can handle temperature changes and moisture.
-
Q: How long does it take for turf glue to dry?
- A: It usually takes 24 hours to fully cure. Avoid walking on the repaired area during this time.


Leave a comment
This site is protected by hCaptcha and the hCaptcha Privacy Policy and Terms of Service apply.